
Introduction
Welcome to the first part of our exciting journey into the world of Kubernetes! For many of you, Kubernetes is a familiar landscape, an irreplaceable tool in your daily work, primarily deployed in cloud environments like AWS or Azure. However, in this blog series, we’re taking a different turn – a dive into the raw, foundational layers of Kubernetes.
We will focus on constructing a Kubernetes cluster from the ground up, not just any cluster – we’re talking about a bare metal solution bootstrapped with Kubeadm. This will be about a deep dive into the heart of Kubernetes, understanding its core components, and the nuts and bolts that make it tick.
Why take this route, you may ask? Because the true essence of mastering a technology lies in understanding its building blocks. By constructing a Kubernetes environment in a home lab environment, we’re not just learning to run Kubernetes; we’re gaining a deep understanding of its architecture and operations. This knowledge is crucial, not just for appreciation but for empowering you to make informed decisions when utilizing cloud-based Kubernetes solutions.
This first article outlines the architectural decisions that will shape our Kubernetes cluster. We’re not diving into the deep end just yet; consider this the blueprint phase, where we decide what we will build in the forthcoming articles. So, buckle up, and let’s embark on this enlightening journey together!
Kubernetes cluster architecture
A Kubernetes cluster consists of two primary types of resources: the Control Plane (known as the master node) and Worker Nodes.
The Control Planes’ role is to manage the state of the cluster. It is the brain behind all operations, responsible for global decisions about the cluster and detecting and responding to cluster events.
Worker nodes are the machines that run applications (using containers runtime). They contain all the necessary services to manage the networking between the containers, communicate with the master node, and allocate resources to the containers scheduled on them.
Here is a simple diagram illustrating the Kubernetes building blocks:
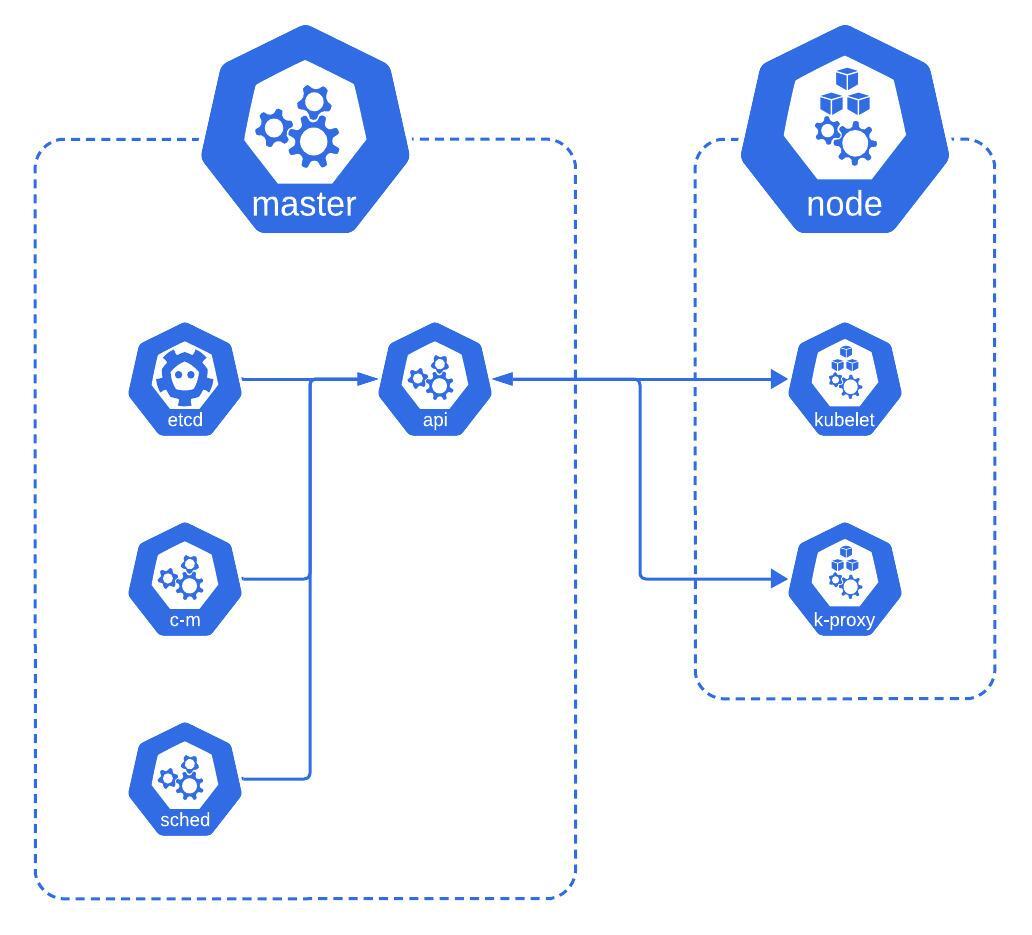
This is just a high-level overview of the Kubernetes architecture. Each component has a complex role, which I’ll explain in the following sections. For those who want to dive deeper into each component’s responsibilities and how they interact, I recommend visiting the official Kubernetes documentation on Kubernetes Components.
In this blog series, I will construct a Kubernetes cluster to demonstrate the foundational concepts and the practical steps in setting up a real-world cluster. The configuration I’ve chosen to build consists of one Control Plane node and three Worker nodes.
Control Plane node
A single Control Plane node simplifies understanding the cluster’s management and operation mechanics. It allows me to focus on the core functionalities of the Control Plane components without the initial complexity of high availability (HA) and the associated networking considerations.
Here’s a quick rundown of the critical services of the Control Plane node:
- etcd: Reliable key-value store that holds the cluster’s configuration and state. While we’ll use a single instance for simplicity, production environments typically use a high-availability setup.
- kube-controller-manager: This service runs various controllers in a single process, handling routine tasks across the cluster, such as managing nodes and endpoint creation.
- kube-scheduler: It assigns newly created Pods to nodes, considering factors like resource needs and operational constraints.
- kube-apiserver: The API server is Kubernetes’ Control Plane interface, handling internal and external requests.
Starting with the proper foundation is crucial when setting up a Control Plane node for Kubernetes. Here are the general minimum requirements for a functional Control Plane:
- Operating System: A Linux-based OS that supports Kubernetes.
- Memory: At least 2GB of RAM.
- CPU: Minimum of 2 CPUs.
- Network Connectivity: A network card with connectivity to all machines in the cluster.
- Disk Space: Adequate storage for the operating system, Kubernetes components, and container images.
With these guidelines in mind, I’ll configure my Control Plane node to exceed these minimum specifications to ensure a more robust and smooth experience. Here’s what my setup looks like:
- Operating System: Ubuntu Server 22.04 LTS.
- Memory: 3GB of RAM to provide additional overhead, facilitating smoother operation of the control processes.
- CPU: 2 CPUs to handle orchestration tasks.
- Disk Space: 20GB of HDD.
- Networking: To ensure both external connectivity and secure internal communications, my setup is equipped with two network cards – one connecting to the public Internet for necessary updates and downloads and the other dedicated to private cluster communications with worker nodes.
Worker nodes
Three Worker nodes provide a balanced and realistic environment for learning how to handle multiple nodes. It is sufficient to demonstrate:
- Load distribution and balancing across nodes.
- Pod scheduling and resiliency.
- Real-world scenarios where applications may span numerous nodes.
- The effectiveness of Kubernetes’ self-healing mechanisms, such as rescheduling Pods from a failed node to a healthy one.
Each node hosts a set of essential components:
- kubelet: This service ensures that containers are running following the Pod specifications provided by the Control Plane.
- kube-proxy: Acting as a network proxy, kube-proxy maintains network rules that enable pod communication within the node or across the cluster.
- Container Runtime: The underlying software which manages the containers’ lifecycle.
While each worker node in a Kubernetes cluster generally mirrors the Control Planes’ minimum requirements, the allocation of resources to these nodes directly impacts their capability to run applications. Here’s a look at the balance we need to strike:
- Allocating fewer resources to a worker node limits the number of applications it can run.
- Allocating more resources allows a node to run more applications. Still, in the event of a node failure or maintenance (which involves draining the node), more applications will need to be rescheduled to other nodes, which can be resource-intensive.
In my home lab setup, I’ve chosen to equip each worker node with:
- 7GB of RAM provides a generous buffer to run multiple applications or services.
- 4 CPUs: With more processing power, we can handle a heavier load and simulate a more realistic production environment.
- 20GB HDD Storage: This ensures sufficient space for our container images and applications.
- 2 Network Cards: As with the Control Plane, one network card is used for public Internet access, while the other manages private cluster communication.
Summary
In this series, we embark on a journey not just to assemble a Kubernetes cluster, but to truly understand the essence of its building blocks. The goal is to master the technology by getting hands-on experience with its underlying components. By constructing and configuring our own cluster, we will learn how Kubernetes operates at a granular level and how each component contributes to the orchestration of containerized applications.
Here’s the overview of the complete setup we aim to achieve:
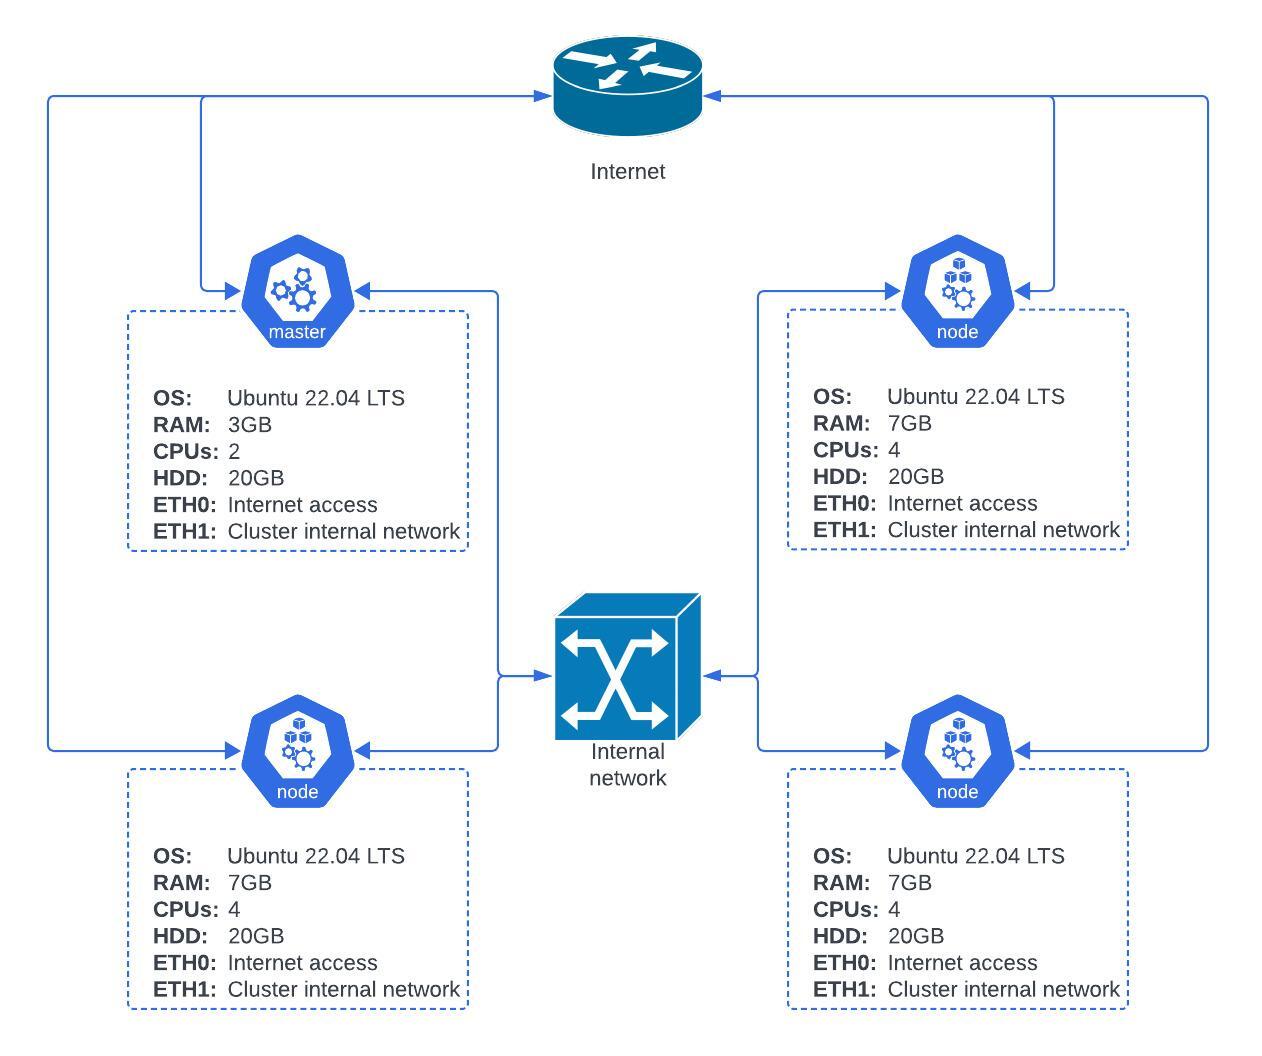
With one Control Plane node and three Worker nodes, our cluster will be capable of simulating real-world scenarios, balancing the workload, and demonstrating Kubernetes’ power in managing, scaling, and self-healing.
As we continue our deep dive into building a Kubernetes cluster, here’s a preview of the key milestones I’ll cover in upcoming posts:
- I’ll start by configuring virtual machines on Hyper-V, installing Ubuntu Server, and setting up the virtual networks that will form the backbone of the Kubernetes cluster.
- The next step involves installing and configuring all the tools on the Control Plane node. I’ll ensure it’s ready to take on the role of managing the Kubernetes cluster.
- Like the Control Plane, I’ll prepare the worker nodes by installing the required tools. I’ll then join them in the cluster.
- With nodes configured, I’ll deploy some essential Kubernetes resources like the metrics server for monitoring resource usage and an ingress controller for managing external access to services. At the end, I’ll deploy a sample application to see everything in action.
Stay tuned for our next post where I lay the digital groundwork and begin the process of building the Kubernetes cluster, piece by piece.
0 Comments