
Introduction
In my previous post, I created the blueprint for the architecture of the Kubernetes cluster. I laid out a comprehensive plan detailing the elements and the rationale behind my choices for building a Kubernetes cluster. This exploration wasn’t just theoretical; it was a prelude to the real, hands-on experience that lies ahead.
As we progress from planning to implementation, it’s time to transform our blueprint into reality. In this post of my series, I dive into the practical aspects of setting up a Kubernetes cluster. I’ll transition from the abstract to the concrete, laying the physical and virtual groundwork necessary to bring the cluster to life.
My focus here is on constructing a solid foundation for a Kubernetes cluster. This involves preparing the infrastructure and ensuring that each node is optimally configured to participate in this puzzle. Let’s revisit the specifications outlined for the Control Plane and Worker nodes and bring these pieces together. By the end of this post, the clusters’ infrastructure will be more than just a plan on paper; it will be an operational, strong foundation ready to host the Kubernetes environment we’re eager to build.
System requirements
Let’s recap the specifications for the Control Plane and Worker nodes, ensuring a clear roadmap as we set up our infrastructure.
Control Plane node
- Operating System: Ubuntu Server 22.04 LTS.
- Memory: 3GB of RAM.
- CPU: 2 CPUs.
- Disk Space: 20GB of HDD.
- Networking: Two network cards – one connecting to the public Internet and the other to private cluster communications.
Worker node
- Operating System: Ubuntu Server 22.04 LTS.
- Memory: 7GB of RAM.
- CPU: 4 CPUs.
- Disk Space: 20GB of HDD.
- Networking: As with the Control Plane, one network is for public Internet access, and the other for private cluster communication.
Physical server
It’s crucial to have a robust and reliable physical server that can efficiently host all virtual machines. As a result, after careful consideration, I have chosen the Asus PB62 Mini PC for this crucial role. This choice is proof of the device’s capabilities and aligns perfectly with the clusters’ needs.
Why Asus PB62 Mini PC?
- Memory and processing power: With 32GB of RAM and an i7 CPU with 8 cores and 16 threads, the Asus PB62 can handle the demands of the entire Kubernetes cluster. This power ensures that all virtual machines operate smoothly without any performance bottlenecks.
- Storage: The nearly 1TB of SSD storage provides plenty of space for all virtual machines and the data they will handle. This SSD storage also contributes to the overall speed and efficiency of the operations.
- Network connectivity: The Asus PB62 has two network cards – Wi-Fi and Ethernet. Although running everything via a wireless network is possible, I have opted for the Ethernet cable connection. This decision is driven by the desire for a more stable and reliable network connection, which is crucial for maintaining the integrity and performance of my Kubernetes cluster.
- Form factor: The mini PC form factor of the Asus PB62 is an added advantage. It fits tidily into my networking infrastructure cabinet, optimizing space without compromising power and functionality.
The Asus Mini PC is an ideal physical host for my home lab Kubernetes environment. Also, its specifications align beautifully with the requirements, promising a seamless and efficient foundation for the virtual infrastructure.
Flexibility in choice of physical server
While the Asus PB62 Mini PC is an excellent fit for my Kubernetes cluster, it’s important to note that this is just one of many viable options. Therefore, readers looking to replicate or adapt this setup can choose a different physical server if it meets or exceeds the combined specifications of the planned virtual infrastructure.
Alternative options
- Any device that can handle the cumulative requirements of the Control Plane and Worker nodes can be a suitable choice. This includes having enough RAM, CPU power, and storage capacity to manage the virtual machines efficiently.
- Using your PC is viable for those who want to experiment or learn without investing in new hardware. Consequently, if your PC has sufficient resources, it can temporarily host the Kubernetes cluster for learning purposes.
Virtual machines setup
With my Asus PB62 Mini PC that already has Windows 11 Pro installed, the next step is to set up the virtual machines that will form the cluster. For this setup, I’ve chosen to use Hyper-V, a native hypervisor in Windows 11 Pro, due to its integration with the servers’ installed operating system. However, it’s worth noting that any reliable hypervisor capable of running Linux operating systems can be used for a similar setup. Overall, if you want to follow my steps, ensure that Hyper-V is enabled in your environment. This can be done through the ‘Turn Windows features on or off’ section in the Control Panel.
I’ll use the PowerShell scripts to streamline the setup process of the Kubernetes cluster on the Windows environment. Notably, PowerShell, with its native integration in Windows, offers an efficient and reliable way to automate the creation and configuration of virtual machines on Hyper-V and can also be added to a Git repository to track changes.
Write setup script
The script will create virtual machines for the Control Plane and Worker Nodes. In particular, we will specify each machine’s required CPU, memory, and disk space, ensuring they are optimally configured for their roles in the cluster. Also, it will help configure the dual-network settings for each virtual machine, aligning them with our planned network infrastructure design.
I will use a top-down approach in scripting, starting with a high-level overview script that encapsulates the core idea of creating the VMs. As a result, this approach will help us understand the overarching process before diving into the intricacies of individual components. So, without further due, let’s dive into the scripting process, starting with a simple yet vital line of code:
$ErrorActionPreference = "Stop"
This line sets the $ErrorActionPreference variable to "Stop". In PowerShell, this variable controls how the shell responds to errors in cmdlet executions. For instance, by default, PowerShell’s error action preference is set to "Continue", which means that the script will attempt to continue execution even if it encounters errors. Consequently, setting $ErrorActionPreference to "Stop" ensures that the script halts immediately if any cmdlet fails during execution.
Variables definition
After setting up our error handling, the next step is to define a set of variables. These variables are handy for customizing and organizing our script:
$KubernetesInfrastructureFolder = "C:\kubernetes"

$UbuntuDownloadURL = "https://releases.ubuntu.com/22.04.3/ubuntu-22.04.3-live-server-amd64.iso"
$PathToUbuntuISO = "$KubernetesInfrastructureFolder\ubuntu-server.iso"

$PublicNetworkSwitchName = "k8s-public-network"
$InternalNetworkSwitchName = "k8s-internal-network"
We need variables for the URL from which we’ll download the Ubuntu Server and the path to the folder where the downloaded Ubuntu ISO will be stored. Additionally, two variables with names of virtual switches for public and internal networks. Finally, all files and configurations related to the setup of virtual machines will be organized within a specified location, denoted by the $KubernetesInfrastructureFolder.
Resources for virtual machines
The next step involves defining the resources for the Control Plane and Worker Nodes. I’ll use hash maps to store the configurations, aligning them with the architecture outlined in the blueprint. Here’s how I set it up:
$MasterVMConfig = @{
    Name = "k8s-master"
    CPU = 2
    Memory = 3GB
    DiskSize = 20GB
}

$WorkerVMConfig = @{
    Name = "k8s-worker"
    CPU = 4
    Memory = 7GB
    Count = 3
}
It’s important to note the differences in hash map configurations for the Control Plane and Worker Nodes. Thus, for the master node, I’ve included the DiskSize property because this node will serve as a template for the Worker nodes. As a result, they will inherit this disk size value for their HDDs, ensuring uniformity and simplicity in the setup process. On the other hand, I included an additional Count property for the Worker nodes, which indicates the number of Worker VMs to be created. In summary, this difference in configuration will be further explained when we progress and discuss the creation of the Virtual Machines.
Download the Ubuntu ISO
With all the variables and configurations set, the next step in the script is to download the Ubuntu Server ISO. Afterward, this ISO will be used to install the operating system on the master virtual machine. Let’s do this with the Start-BitsTransfer cmdlet:
Start-BitsTransfer `
    -Source $UbuntuDownloadURL `
    -Destination $PathToUbuntuISO
The Start-BitsTransfer is a cmdl that uses Background Intelligent Transfer Service (BITS) to facilitate file downloads over HTTP or HTTPS. Importantly, it’s well-suited for large files like an ISO image, providing reliable and resumable transfers.
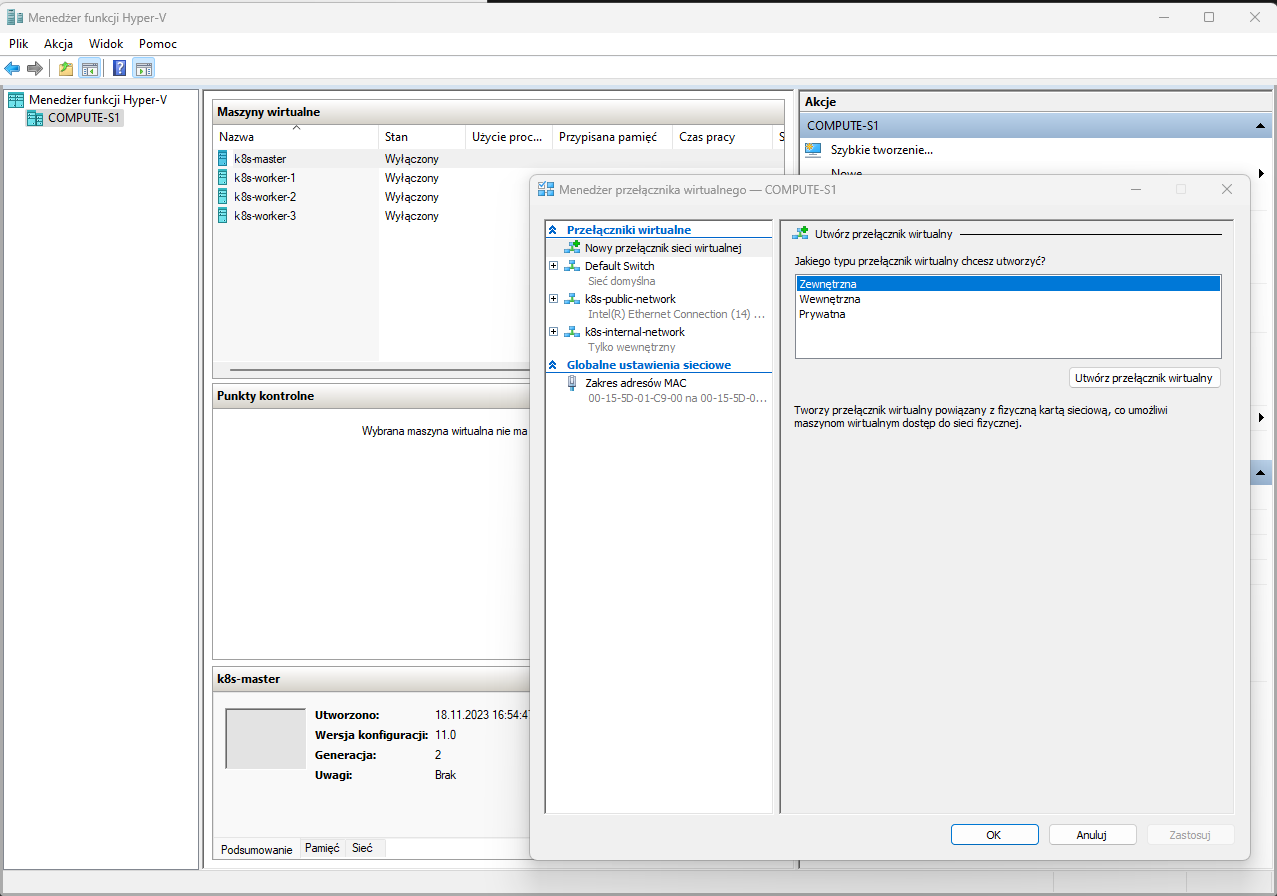
Create virtual switches
With the Ubuntu ISO downloaded, we now focus on configuring the network. Consequently, this involves creating virtual switches using Hyper-V. Here’s the relevant portion of the code for this task:
$selectedNetAdapterName = Select-PublicNetworkAdapter

Write-Host "Creating Public network Virtual Switch..."
New-VMSwitch -Name $PublicNetworkSwitchName `
    -NetAdapterName $selectedNetAdapterName `
    -AllowManagementOS $true `
    -Notes "K8S public network NAT switch"

Write-Host "Creating Internal network Virtual Switch..."
New-VMSwitch -Name $InternalNetworkSwitchName `
    -SwitchType Internal `
    -Notes "K8S internal network switch"
The script begins by selecting a network adapter using the Select-PublicNetworkAdapter function. This function (which I will define later) allows for selecting an appropriate network card from the Asus PB62, which has two network cards. Then, the New-VMSwitch cmdlet is used to create a virtual switch for public network access. Importantly, this switch is bound to the selected physical network adapter and is configured to allow the management OS to share the network adapter. Additionally, another virtual switch is created for the internal network. As a result, this switch is of the ‘Internal’ type and enables communication among VMs within the same Hyper-V host or between VMs and the host machine.
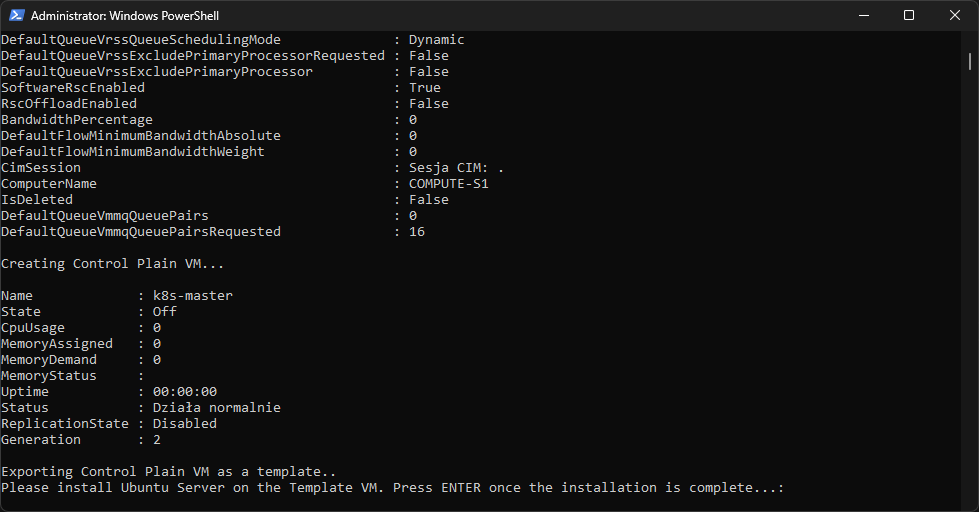
Create a VM for the Control Plane
After setting up the necessary network infrastructure, the next step is to create the virtual machine for the Control Plane. To do this, we’ll use a custom function, New-VirtualMachine, which I’ll define later. Notably, this function uses the configurations we established earlier in one of the hash maps, the virtual switches, and the downloaded Ubuntu ISO. Here’s the code snippet for creating the Control Plane VM:
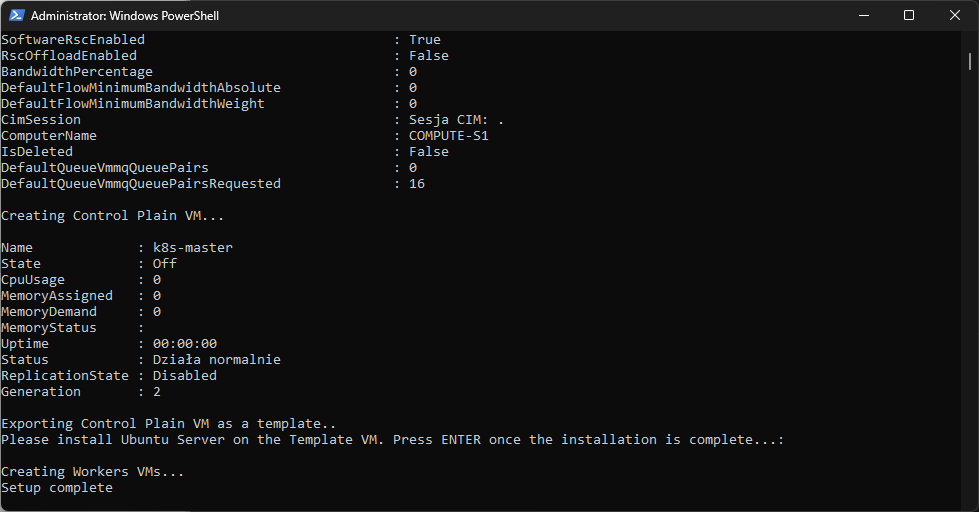
Write-Host "Creating Control Plane VM..."
New-VirtualMachine -Name $MasterVMConfig.Name `
    -CPU $MasterVMConfig.CPU `
    -Memory $MasterVMConfig.Memory `
    -DiskSize $MasterVMConfig.DiskSize `
    -OperatingSystemISOPath $PathToUbuntuISO `
    -PublicNetworkSwitchName $PublicNetworkSwitchName `
    -InternalNetworkSwitchName $InternalNetworkSwitchName `
    -FilesOutputPath $KubernetesInfrastructureFolder
The VM is configured with the specifications detailed in the $MasterVMConfig hash map, including CPU, memory, and disk size. Subsequently, the script also points to the path of the downloaded Ubuntu ISO, which will be used to install the operating system on the VM during the first boot and utilizes both the public and internal network switches we created, ensuring the VM is connected to designed networks. Ultimately, I specified that all the files related to this VM would be output to the Kubernetes infrastructure folder.
Export the Control Plane virtual machine
An efficient strategy in our Kubernetes cluster setup involves using the Control Plane VM as a template for creating the Worker nodes. To explain, this method saves time and ensures uniformity, omitting the need to install the system separately on each VM. Here’s the relevant script snippet to achieve this:
Write-Host "Exporting Control Plane VM as a template.."
New-KubernetesNodeTemplate -TemplateVirtualMachineName $MasterVMConfig.Name `
    -TemplatePath "$KubernetesInfrastructureFolder\kubernetes-node-template"

$templatePath = Get-ChildItem `
    -Recurse `
    -Path "$KubernetesInfrastructureFolder\kubernetes-node-template" *.vmcx | % { $_.FullName }
The New-KubernetesNodeTemplate function is used to export the Control Plane VM. Then, the VM specified in the $MasterVMConfig.Name is shipped to the kubernetes-node-template folder in our Kubernetes infrastructure directory. After exporting, the script captures the path to the exported VM template and stores it in the $templatePath variable. Finally, this path will be used for the subsequent creation of Worker nodes.
An important aspect of exporting the Control Plane VM as a template is its potential use in future expansions and enhancements of our Kubernetes cluster. In other words, the exported template is not limited to just the initial setup of our Worker nodes, but it can be used for:
- Quickly add more Worker nodes.
- For those looking to build a more resilient and robust Kubernetes environment, this template can also be used to set up a high-availability configuration for the master node.
Create VMs for Worker nodes
With the template ready, the final step in our setup script is to create the Worker VMs. Thus, this is accomplished using a custom function, New-VirtualMachineFromTemplate. Here’s the code snippet for creating the Worker nodes:
Write-Host "Creating Workers VMs..."
1..$WorkerVMConfig.Count | ForEach-Object {
    $Name = "$($WorkerVMConfig.Name)-$($_)"
    New-VirtualMachineFromTemplate -Name $Name `
        -Memory $WorkerVMConfig.Memory `
        -CPU $WorkerVMConfig.CPU `
        -TemplatePath $templatePath `
        -FilesOutputPath $KubernetesInfrastructureFolder
}

Write-Host "Setup complete"
The script uses a loop to create the specified number of Worker VMs as defined in the $WorkerVMConfig.Count. As a result, for each iteration, a new VM name is generated by appending a unique number to the $WorkerVMConfig.Name. Importantly, this ensures each Worker node has a distinct name. Next, the New-VirtualMachineFromTemplate function is then called to create each VM. It takes parameters like name, memory, CPU, and the path to the template we previously exported. While memory and CPU are specified for each new VM, configurations like disk size and operating system are inherited from the Control Plane VM template. As a result, this ensures consistency across all nodes. Finally, all files related to these VMs are stored in our designated Kubernetes infrastructure folder, keeping our setup organized.
A brief summary of the script
In a top-down approach for scripting the setup, we’ve crafted a comprehensive PowerShell script that methodically builds our clusters’ infrastructure. Indeed, this approach has allowed us to outline the overarching process. Let’s summarize what we have so far:
- We began by defining variables and configurations, laying the groundwork for a structured and organized setup process.
- The script automates the download of the Ubuntu Server ISO, ensuring we have the required operating system for our VMs.
- We then created virtual switches, setting up the network environment for public internet access and private cluster communication.
- The script then creates the Control Plane VM.
- To simplify the creation of Worker nodes, the Control Plane VM is exported as a template, ensuring consistency and efficiency in setting up additional nodes.
- Finally, the script utilizes the exported template to create Worker VMs, completing the setup of the essential components of our Kubernetes cluster.
Define helper functions
As we dive deeper into the intricacies of setting up the cluster, let’s explore the custom PowerShell functions used in the script. Primarily, these functions, each with a specific role, streamline complex tasks and bring automation to the setup. In the following sections, we will delve into the details of each function, understanding how they contribute to deploying our Kubernetes environment.
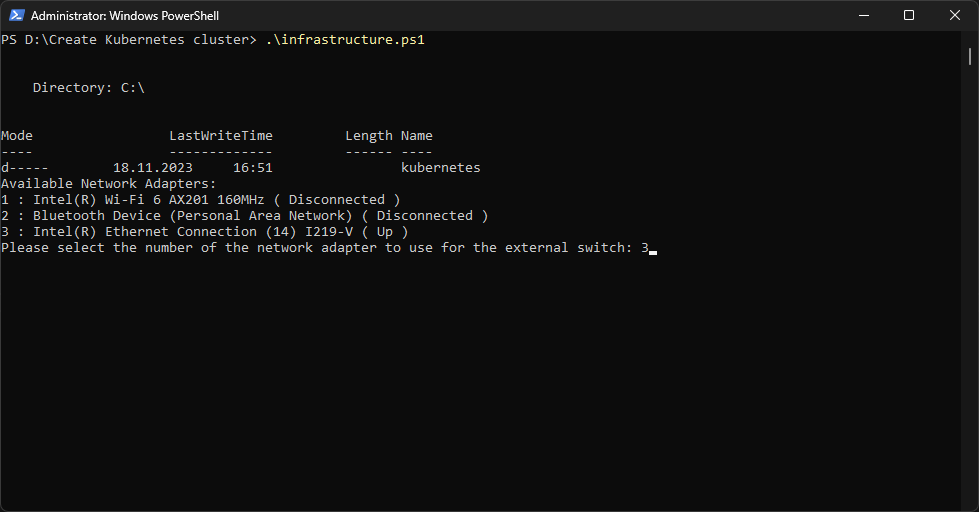
Select-PublicNetworkAdapter
The Select-PublicNetworkAdapter function is used in setting up the network infrastructure for the cluster. Hence, it allows users to select the appropriate network adapter for public internet access. Here’s the body of the function:
function Select-PublicNetworkAdapter {
    $netAdapters = Get-NetAdapter | Select-Object -Property Name, Status, InterfaceDescription

    Write-Host "Available Network Adapters:"
    $netAdapters | ForEach-Object {
        Write-Host ($netAdapters.IndexOf($_) + 1) ":" $_.InterfaceDescription "(" $_.Status ")"
    }

    $selectedAdapterIndex = Read-Host -Prompt "Please select the number of the network adapter to use for the external switch"
    return $netAdapters[$selectedAdapterIndex - 1].Name
}
The function starts by fetching a list of all available network adapters on the system using Get-NetAdapter. It then selects essential properties like Name, Status, and InterfaceDescription for each adapter. Next, the adapters are displayed to the user with an associated number, making identifying and selecting the desired adapter easy. Afterward, the function prompts the user to choose the adapter by entering the corresponding number. As a result, this input is captured in $selectedAdapterIndex. Finally, the function returns the name of the selected adapter.
New-VirtualMachine
The New-VirtualMachine function is designed to automate the creation of virtual machines for our Kubernetes cluster, utilizing Hyper-V’s capabilities. This function leverages the built-in New-VM cmdlet and other related cmdlets to configure each VM according to the specified requirements. Here’s a look at the function:
function New-VirtualMachine {
    param (
        [string]$Name,
        [int]$CPU,
        [string]$Memory,
        [string]$DiskSize,
        [string]$OperatingSystemISOPath,
        [string]$PublicNetworkSwitchName,
        [string]$InternalNetworkSwitchName,
        [string]$FilesOutputPath
    )

    New-VM -Name $Name `
        -Path "$FilesOutputPath\$Name" `
        -MemoryStartupBytes $Memory `
        -Generation 2 `
        -NewVHDPath "$FilesOutputPath\$Name\drive.vhdx" `
        -NewVHDSizeBytes $DiskSize `
        -SwitchName $PublicNetworkSwitchName

    Set-VMProcessor -VMName $Name -Count $CPU
    Set-VMMemory -VMName $Name -DynamicMemoryEnabled $false
    Add-VMDvdDrive -VMName $Name -Path $OperatingSystemISOPath
    Add-VMNetworkAdapter -VMName $Name -SwitchName $InternalNetworkSwitchName

    $dvd = Get-VMDvdDrive -VMName $Name
    $hdd = Get-VMHardDiskDrive -VMName $Name
    Set-VMFirmware -VMName $Name -EnableSecureBoot Off -BootOrder $dvd,$hdd
}
The function begins by creating a new Generation 2 VM with the specified name, path, memory, and disk size and attached to the public network switch. Next, the CPU count is set using the Set-VMProcessor, and the VM is configured to use static memory allocation for stability. Then, an additional network adapter is added for the internal network, ensuring proper network setup for both public and internal communications. Also, a DVD drive is then added to the VM with the path to the operating system ISO. Notably, this step is crucial for installing the operating system on the VM during the first boot. Finally, the function modifies the VM’s firmware settings to disable Windows Secure Boot (necessary for Linux-based systems) and sets the boot order to prioritize booting from the DVD drive first and then the hard disk.
New-KubernetesNodeTemplate
The New-KubernetesNodeTemplate function is designed to facilitate the creation of a VM template for nodes. Consequently, this template will be used later to create Worker nodes and streamline their setup. The function is tricky to implement because it includes steps for installing the operating system and exporting the VM as a template. Here’s the breakdown of the function:
function New-KubernetesNodeTemplate {
    param (
        [string]$TemplateVirtualMachineName,
        [string]$TemplatePath
    )

    Start-VM -Name $TemplateVirtualMachineName

    Read-Host "Please install Ubuntu Server on the Template VM. Press ENTER once the installation is complete..."

    Stop-VM -Name $TemplateVirtualMachineName -TurnOff
    Export-VM -Name $TemplateVirtualMachineName -Path $TemplatePath
}
The function begins by starting the VM specified in $TemplateVirtualMachineName. This VM is already configured to boot from the Ubuntu Server ISO. As a result, a critical step is the users’ manual installation of the Ubuntu Server. Thus, the function pauses and prompts the user to complete the installation process. This ensures the user controls the OS installation and configures it as needed. Once the user indicates that the installation is complete (by pressing ENTER), the function shuts down the VM. The final step is to export the VM to the path specified in $TemplatePath.
New-VirtualMachineFromTemplate
The final custom function in our setup script is New-VirtualMachineFromTemplate. This function creates new Worker VMs from the previously exported template. Moreover, it ensures that each Worker VM is a distinct entity with its resources and settings. Here’s the code snippet for this function:
function New-VirtualMachineFromTemplate {
    param (
        [string]$Name,
        [string]$Memory,
        [int]$CPU,
        [string]$TemplatePath,
        [string]$FilesOutputPath
    )

    $VM = Import-VM -Path $TemplatePath `
        -Copy `
        -GenerateNewId `
        -VhdDestinationPath "$FilesOutputPath\$Name" `
        -VirtualMachinePath "$FilesOutputPath\$Name"

    Rename-VM -VM $VM -NewName $Name
    Set-VMProcessor -VMName $Name -Count $CPU
    Set-VMMemory -VMName $Name -StartupBytes $Memory -DynamicMemoryEnabled $false
}
The function starts by importing the VM from the specified template path. The -Copy and -GenerateNewId parameters are crucial as they ensure that each imported VM is a distinct copy with a new identifier. The -VhdDestinationPath and -VirtualMachinePath parameters define where the virtual hard disk and VM files for the new VM will be stored – in our case, this will be the Kubernetes infrastructure folder. Next, after import, the VM is renamed to the specified $Name, giving it a unique identity within the cluster and the assigned resources of the VM are then adjusted to the specified values using Set-VMProcessor and Set-VMMemory.
In our journey to set up a Kubernetes cluster, we’ve implemented several custom PowerShell functions, each playing a vital role in the process. These functions automate complex tasks and bring precision and efficiency to our setup. Here’s a summary of each function and its contribution:
- Select-PublicNetworkAdapter: This function is required to choose the appropriate network adapter for public internet access, ensuring that our cluster’s network configuration starts on the right footing.
- New-VirtualMachine: It automates the creation of a virtual machine with specified resources like CPU, memory, and network settings.
- New-KubernetesNodeTemplate: This function exports the VM as a template after the operating system installation.
- New-VirtualMachineFromTemplate: It creates new Worker nodes from the exported template, ensuring each node is a unique instance but maintaining uniformity in the base configuration.
Create infrastructure
We’ve navigated through the planning and scripting phases of setting up the Kubernetes cluster. It’s time for the most exhilarating part – bringing the cluster to life! This next section of our journey is where we witness the fruits of our labor. I will provide step-by-step instructions when executing the script, complemented by illustrative screenshots, to make this experience as informative as possible. Let’s embark on this thrilling phase enthusiastically and witness our Kubernetes cluster come to life!
Run the script
The first step to run the script to set up the Kubernetes cluster is to open the PowerShell with Administrator permissions, and we need elevated privileges to make changes to the system. Therefore, before running our script, we have to set the appropriate execution policy in PowerShell because the default will block the execution. We can use a RemoteSigned policy by typing the command Set-ExecutionPolicy RemoteSigned.
Set-ExecutionPolicy RemoteSigned
Next, we initiate the script by navigating to the directory where the script is located and then running it. As you probably remember, the first step involves downloading the Ubuntu Server ISO, which can be time-consuming depending on the internet connection. Once the ISO is downloaded, we’ll be prompted to select a network adapter. I chose the 3rd option in my setup, corresponding to the Ethernet network card. Subsequently, the script will create two virtual switches – one for public internet access and another for internal cluster communication. Next, the Control Plane VM is created. At this point, we’ll need to manually install the Ubuntu Server on this VM. Here are a couple of screenshots to illustrate this process:
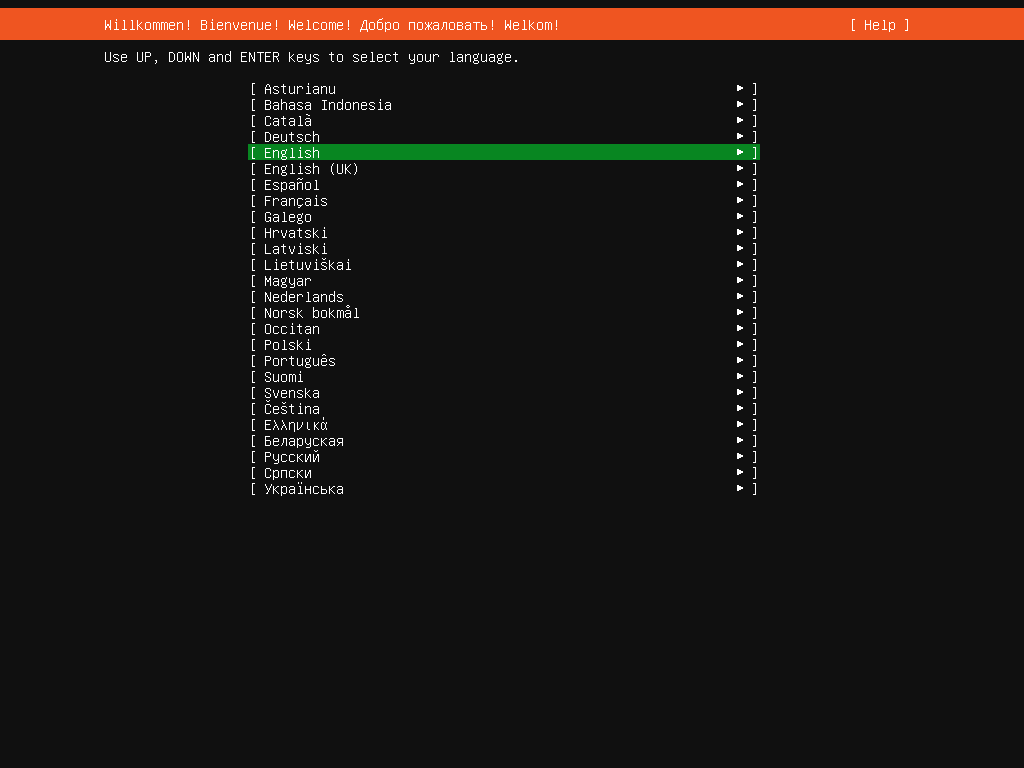
Install the Ubuntu Server
Installing the Ubuntu Server on our Control Plane VM is a crucial step. While the process is straightforward, there are specific choices to make for our Kubernetes cluster setup:
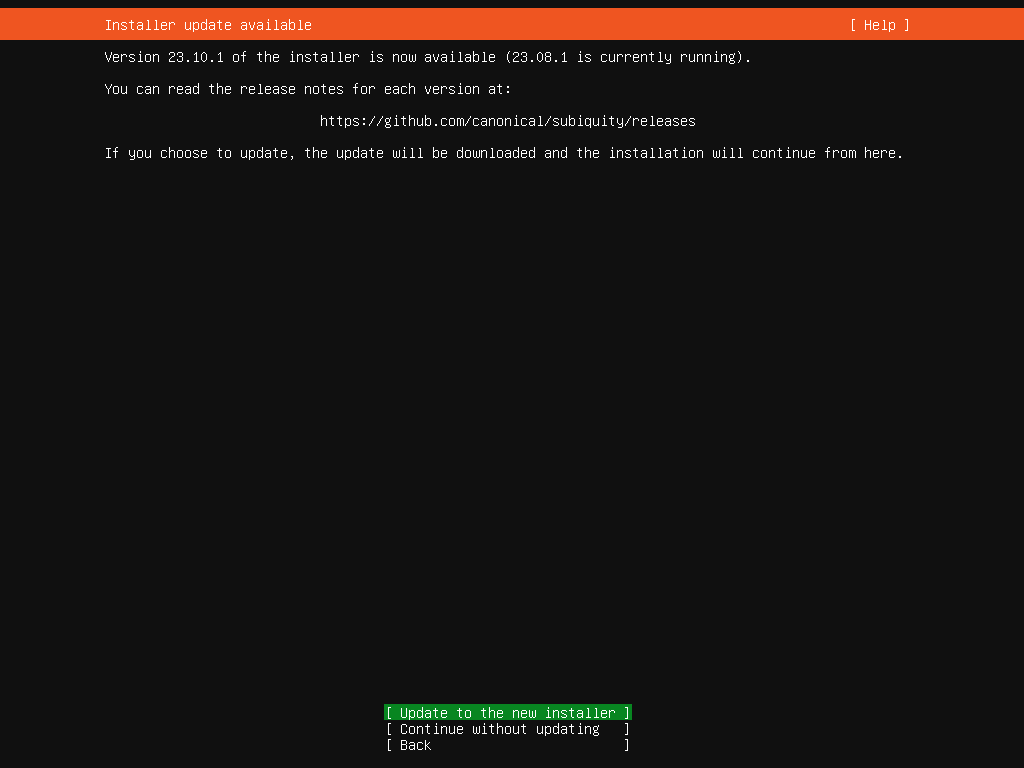
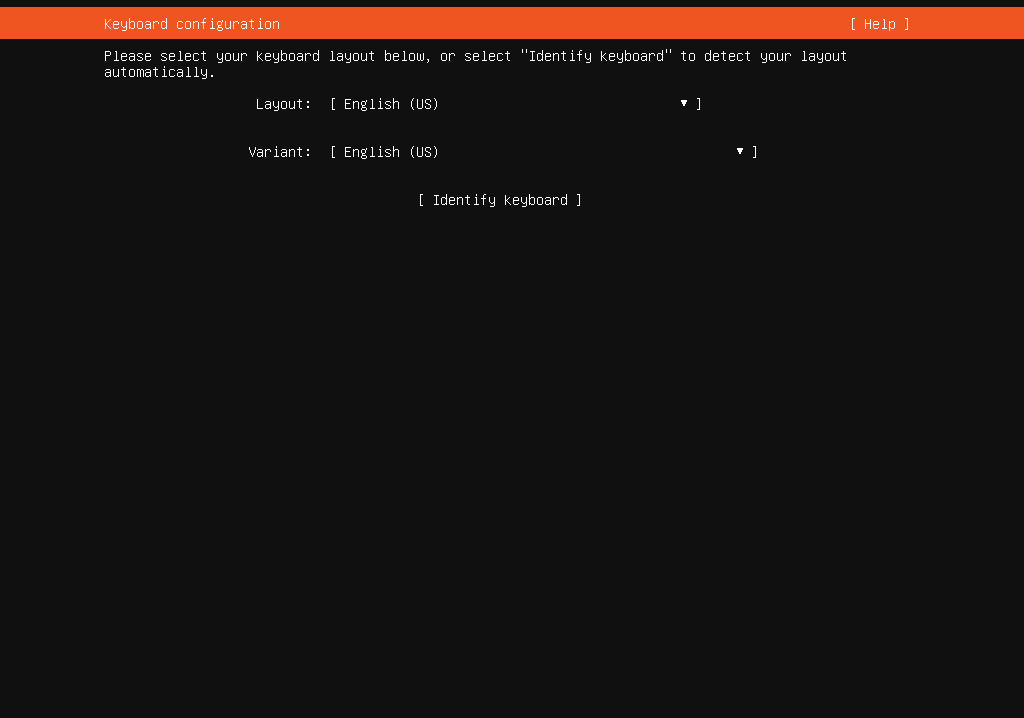
- Let’s start by selecting the language and keyboard layout. Then, update the installer if prompted. This ensures that we have the latest features and security updates.
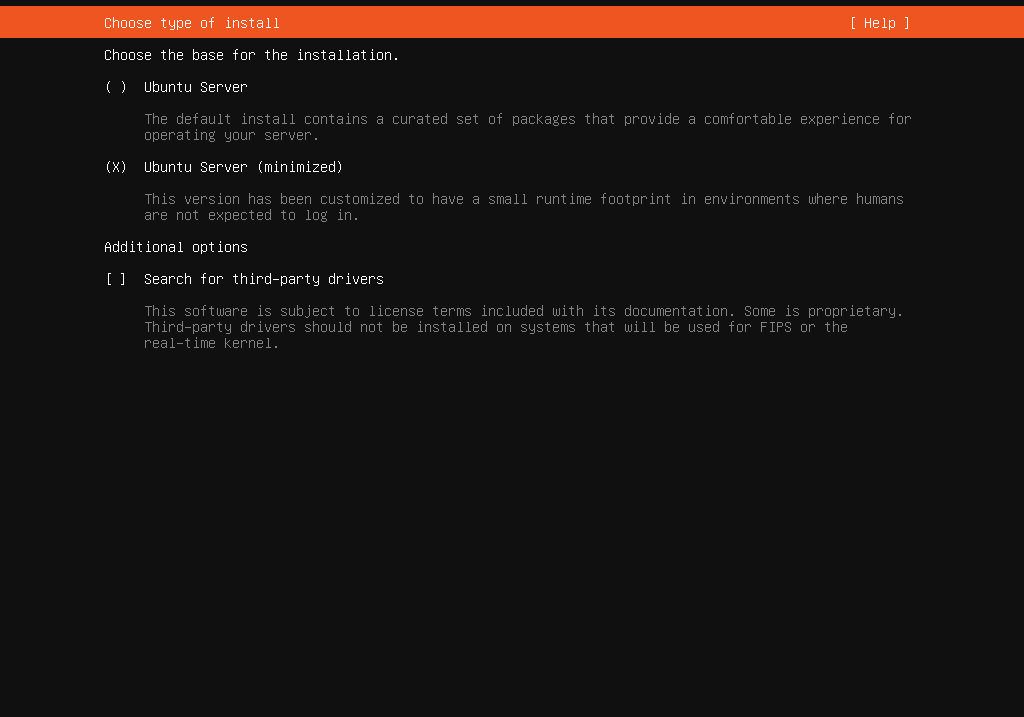
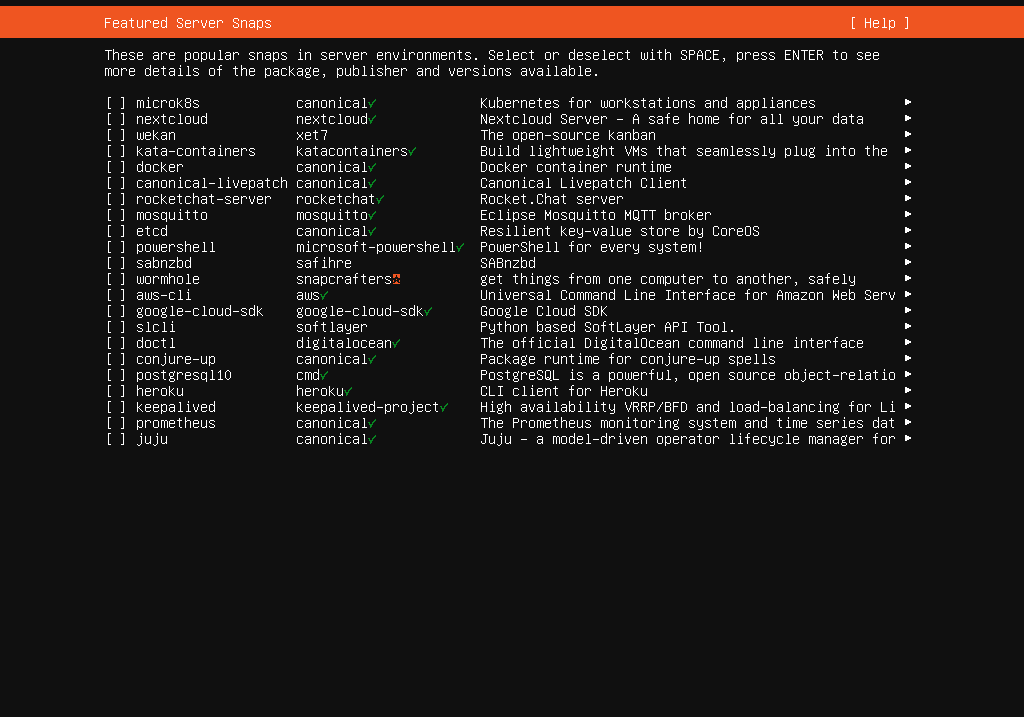
- Next, select the ‘Ubuntu Server (minimized)’ option. This version has a small runtime footprint, ideal for our purposes, as we’ll primarily interact with the server via console.
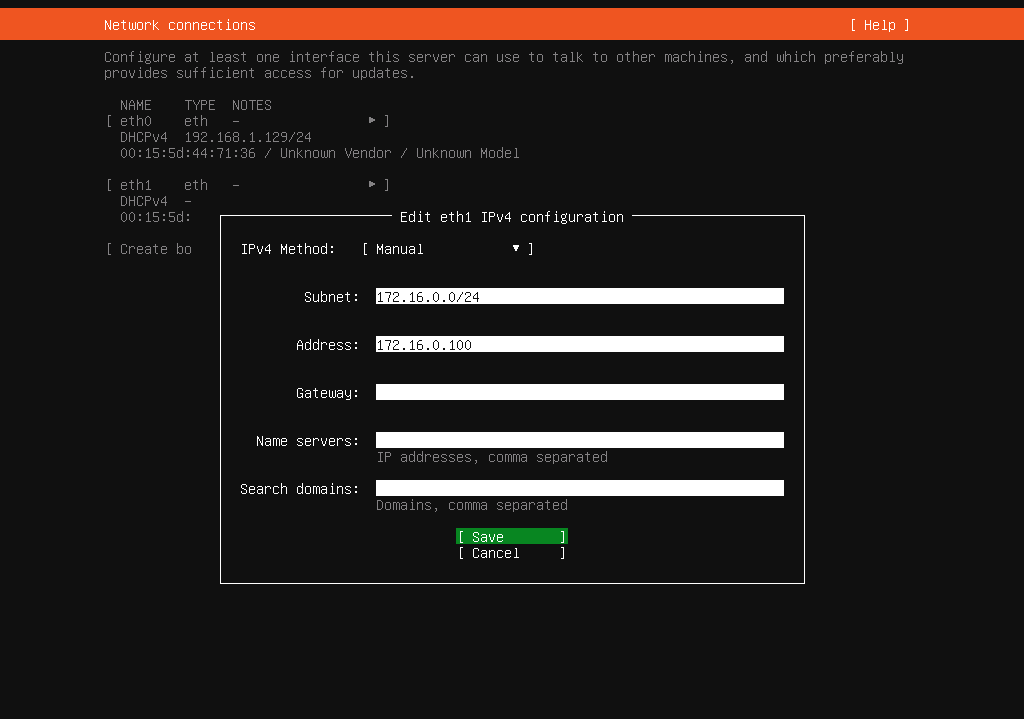
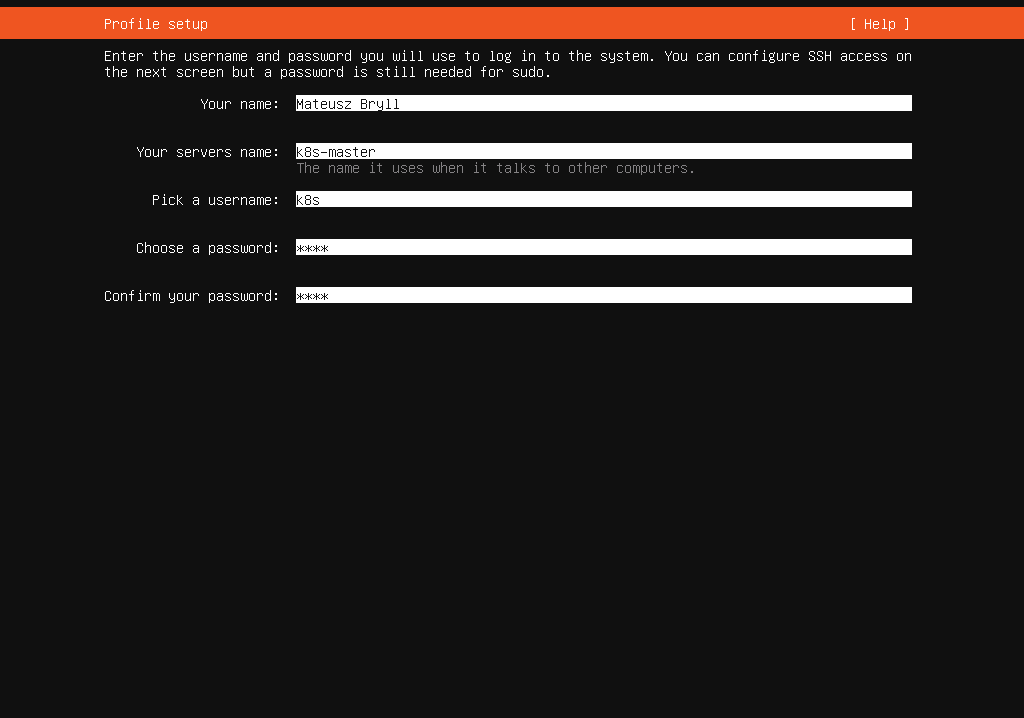
- Then, we need to configure the
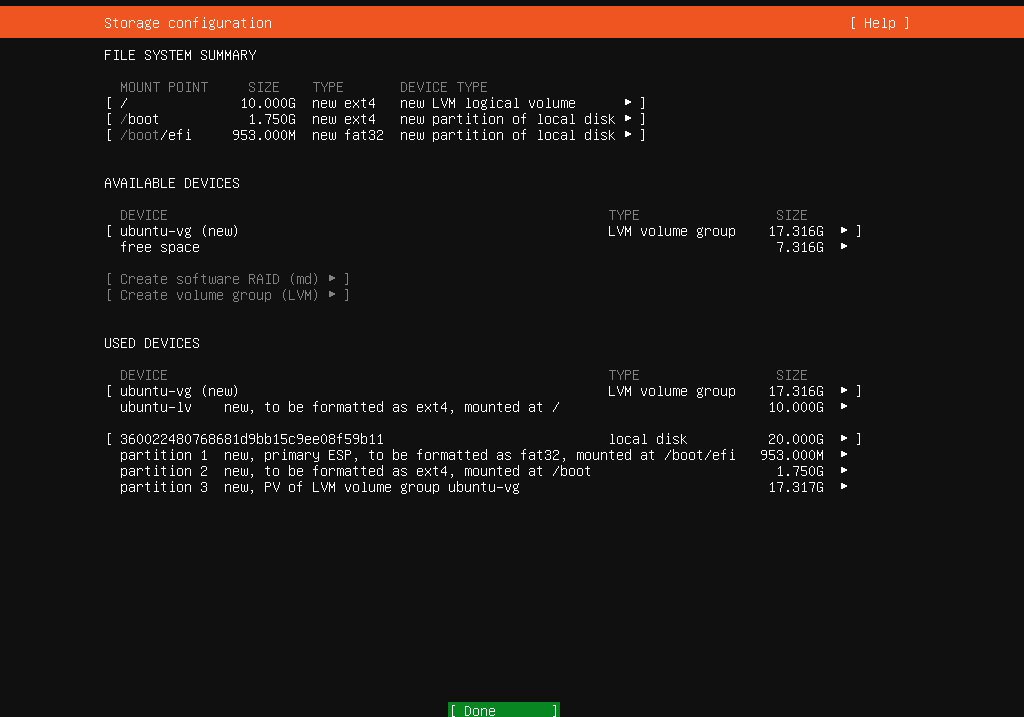
eth1network card for internal cluster communication when setting up the network. Let’s assign a static IP address to this interface. In my setup, the network address is172.16.0.0/24, with the master node172.16.0.100assigned. Additionally, future Worker nodes will follow the pattern172.16.0.(100+worker-number). - Afterward, we select a disk layout and create a user account to manage the server. In my case, the username is
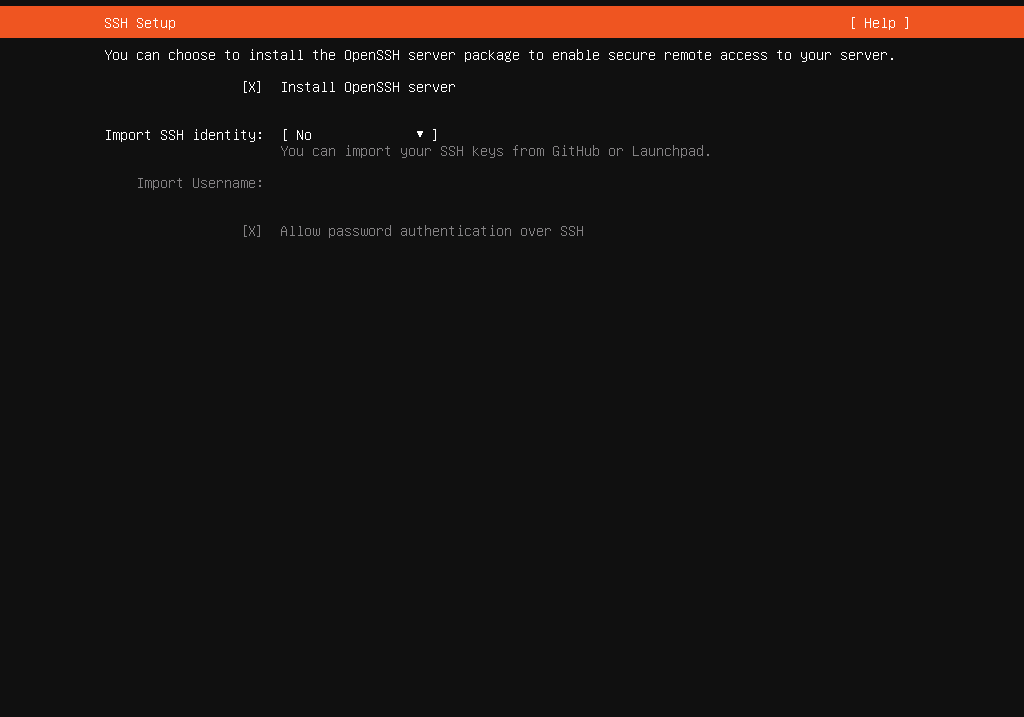
k8s. - In the next step, we need to ensure the installation of the OpenSSH server during setup. This will allow remote interaction with the node via SSH.
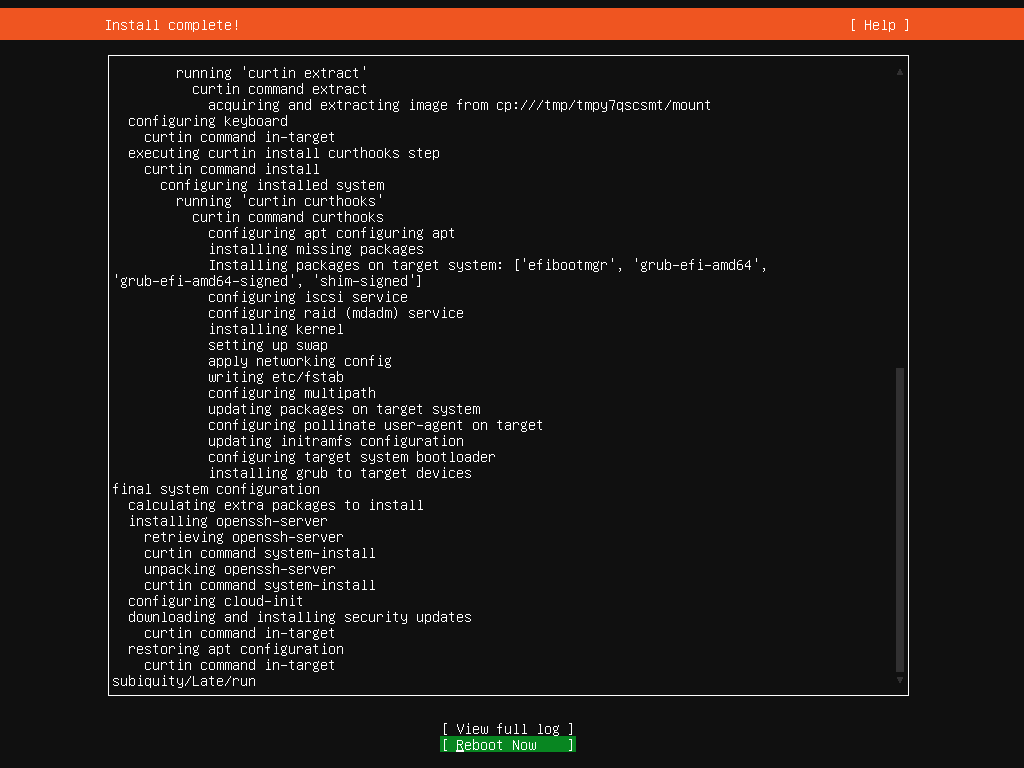
- Finally, after the installation is complete, we can reboot the machine. Upon reboot, you might encounter a CDROM error, but this can be safely ignored. So, we can return to the PowerShell window to press ENTER, signaling that the installation is complete and the script can continue.
Here are screenshots illustrating the steps of the installation process:

Finish setup
As we reach the final stages of our script execution, the following steps involve exporting the Control Plane VM as a template and using this template to create the Worker nodes. Significantly, our script automates this process. These screenshots illustrate the result of our setup process. Seeing all the VMs and network switches in place is a significant milestone and an indicator of the successful creation of our Kubernetes cluster infrastructure.
Additional steps
Our journey in creating a Kubernetes cluster has reached an exciting juncture. While the core structure is now in place, several critical steps remain before we dive into the actual configuration of Kubernetes. So, in the upcoming section, we’ll walk through these essential preparatory steps, ensuring our cluster is primed for a smooth and successful configuration process.
Change hostname and static IPs
We must set unique hostnames and IP addresses for each Worker node. This ensures easy identification and proper network communication within the cluster. Let’s go through the process for the first worker node as an example:
Changing the hostname
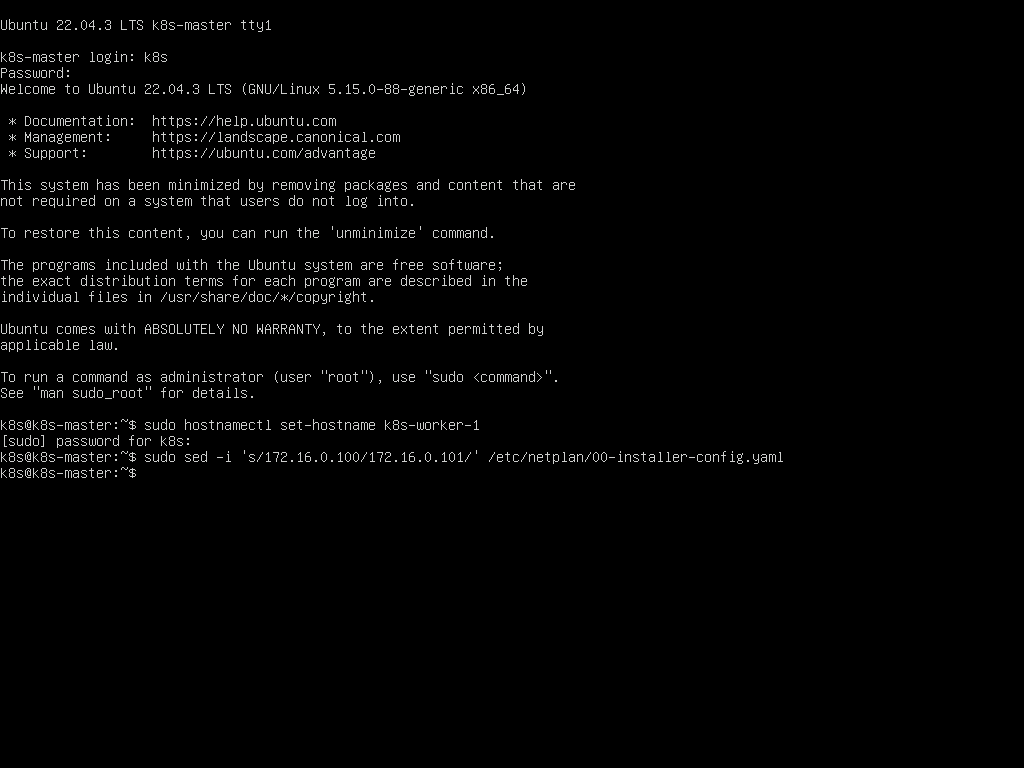
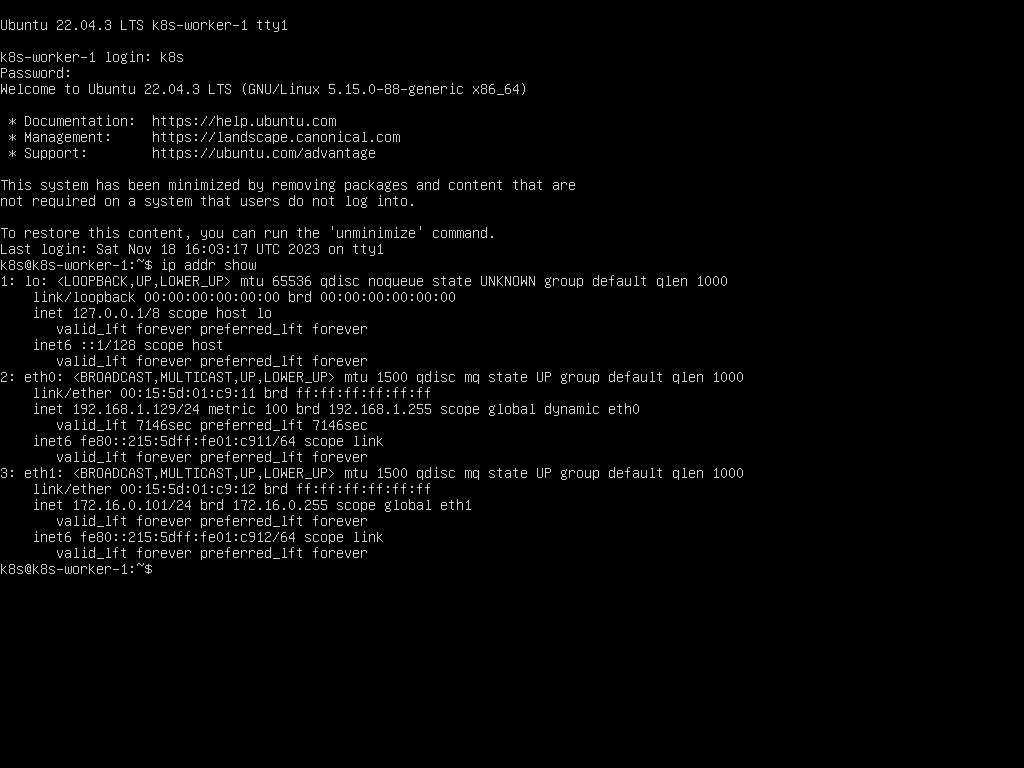
Start by booting up the first Worker VM. Once logged in, change the hostname to k8s-worker-1 using the command:
sudo hostnamectl set-hostname k8s-worker-1
Updating the IP address
Next, we need to update the static IP address assigned during the system installation, as all nodes currently have the Control Plane’s IP (172.16.0.100). To do this, we can use the sed command to edit the IP address in the configuration file created during system installation:
sudo sed -i 's/172.16.0.100/172.16.0.101/' \
    /etc/netplan/00-installer-config.yaml
This command replaces the existing IP address with 172.16.0.101, setting a unique IP for the first Worker node.
Rebooting the VM
After making these changes, we can reboot the VM to apply them:
sudo reboot
Once rebooted, the Worker node will be accessible with its new hostname and IP address.
Other Workers
We can now repeat this process for each Worker node, incrementing the IP address for each node, for instance 172.16.0.102 for k8s-worker-2, and so on.
Check connectivity
Having set unique hostnames and IP addresses for our Worker nodes, the next crucial step is to confirm that these nodes are accessible and communicating correctly within the network. Here’s how we can check the connectivity:
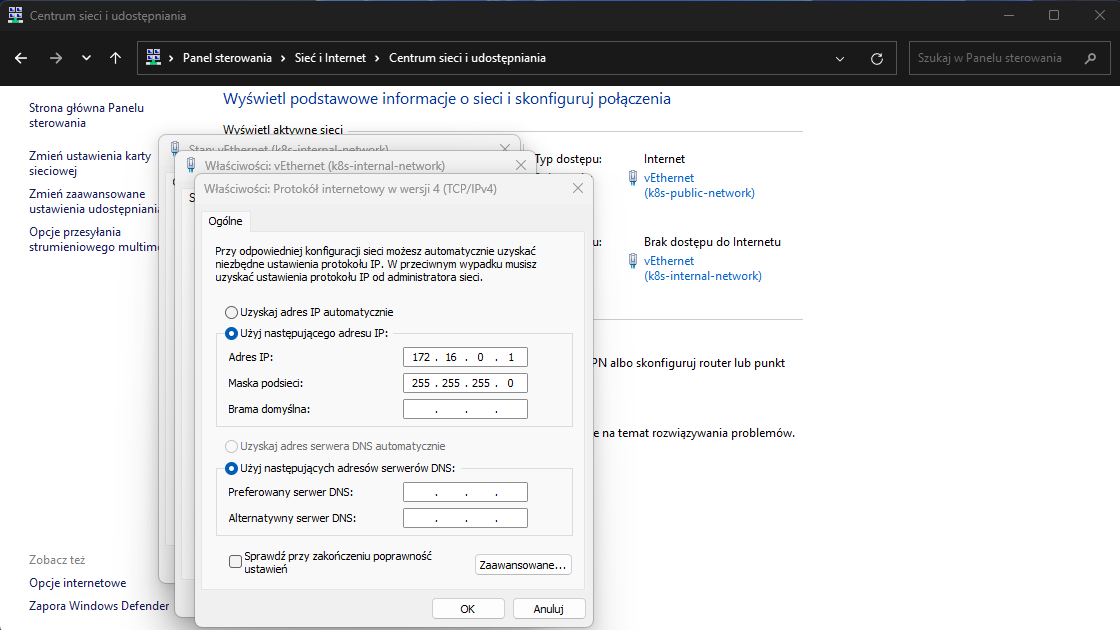
Set a static IP address on the host
Let’s navigate to the Control Panel on the host machine. Then, we need to configure the network settings of the virtual network card associated with the k8s-internal-network switch to set a static IP address of 172.16.0.1. This step ensures the host can communicate within the same network range as the Kubernetes VMs.
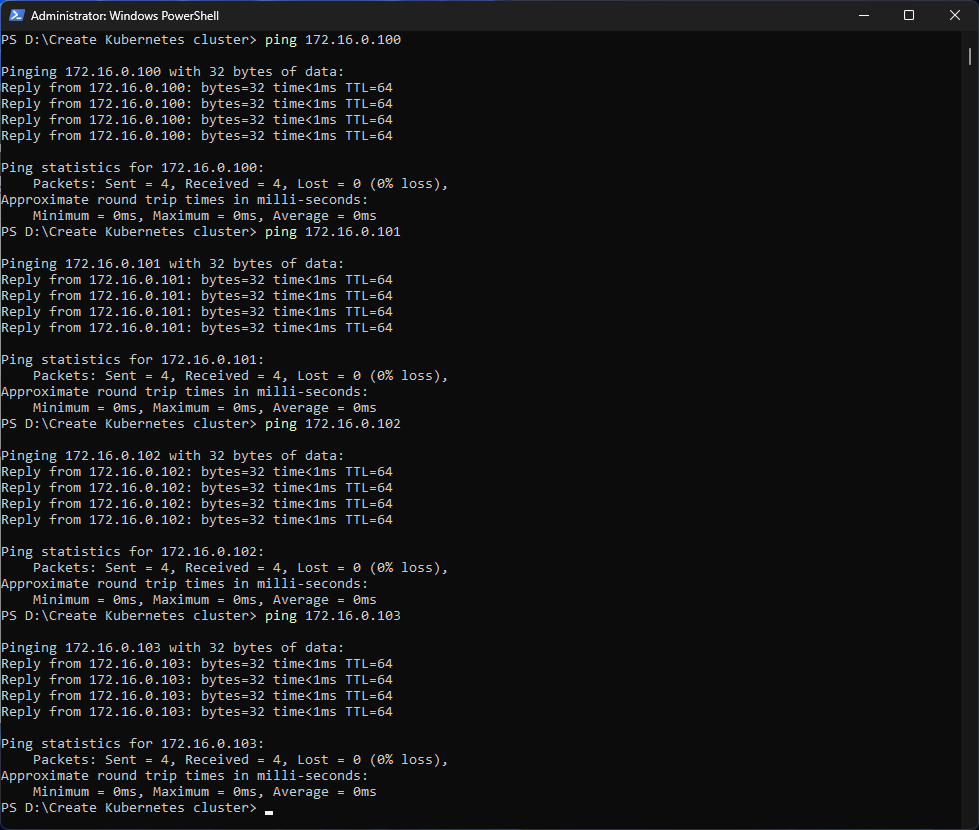
Test connectivity
Next, we can open a command prompt on the host machine and use the ping command to test connectivity to each VM. For instance, to check the connection with the first Worker node, we can use:
ping 172.16.0.101
Here are a couple of screenshots illustrating the process:
Make a snapshot
As we approach the final stages of our initial setup, creating snapshots of our VMs is crucial. This step provides a safety net, allowing us to revert to a known good state quickly during future configurations. Let’s go through the process of creating these snapshots:
Using Hyper-V Manager
- Let’s open the Hyper-V Manager on the host machine.
- Next, we can right-click on each VM (both the Control Plane and Worker Nodes) in the list.
- Finally, select ‘Snapshot’ to create a snapshot of the VM. To explain, this action captures the current state of the VM, which can be reverted to if necessary.
Using PowerShell
Alternatively, we can use PowerShell to create snapshots. Importantly, this method can be faster, especially when we have multiple VMs. First of all, we need to open PowerShell with elevated privileges, so let’s run it as Administrator. Then, we can call the Checkpoint-VM cmdlet for each VM, so for instance, for the Master node, the command will look as follows:
 Checkpoint-VM -Name k8s-master `
    -SnapshotName "Clean VM after infrastructure setup"
Summary
All right, let’s conclude this comprehensive article. It’s important to reflect on the significant milestones we’ve achieved in setting up our Kubernetes cluster based on the blueprint from the previous post.
What have we achieved so far?
We have successfully set up all the virtual machines on the Asus PB62 Mini PC that will form the backbone of our Kubernetes cluster. This includes both the Control Plane and Worker Nodes, each configured with the specific resources and settings outlined in our blueprint. Then, the entire process has been automated through a PowerShell script, making it reproducible and efficient. In addition, this automation saves time and reduces the potential for manual errors during setup. The next big step we achieved was to create a template VM, which is a key resource for simplifying the setup process and allowing cluster scaling. This template can be used to quickly spin up additional Worker Nodes or Control Planes, facilitating easy expansion of our cluster in the future.
There’s a significant similarity between our setup and how Kubernetes clusters are managed in cloud environments like Azure. In a cloud setting, node pools are created where VMs are automatically provisioned by the cloud provider. In other words, each VM in these pools is typically based on a Kubernetes-optimized template, which includes pre-configured networking, operating systems, and essential tools, much like our own setup.
What’s next?
This journey has equipped us with a functional infrastructure to build the Kubernetes cluster and provided insights into the inner workings of Kubernetes, akin to what one would experience in a cloud environment. Therefore, the skills and understanding gained here lay a solid foundation for managing and scaling Kubernetes clusters, whether on-premises or in the cloud.
Stay tuned for my next posts, where I will delve into the actual configuration of the Kubernetes cluster, bringing our setup to life and exploring the dynamic capabilities of Kubernetes.
0 Comments